
Now Available: Order Our Most Popular Products Online at Our Best Prices, On Your Schedule @ xPress.ink


Nonprofit organizations (NPO’s) enjoy deep discounts from the USPS on marketing mail (bulk mail) postage rates. This is great news because direct mail has the biggest ROI when it comes to nonprofit fundraising.
In order to receive these discounts, nonprofits need to apply for and receive nonprofit status with the United States Postal Service (USPS).
In this step-by-step guide, I will explain exactly how to apply for and ultimately use your nonprofit status.
Table of Contents
An Overview of How to Apply for Nonprofit Status With the USPS
Applying for nonprofit status and unlocking nonprofit postage discounts can be summarized in three steps.
Step 1: Apply For and Receive Nonprofit Authorization Letter and Number
In order to receive nonprofit status with the USPS, you must:
- Collect supporting documentation proving nonprofit eligibility:
- Evidence of nonprofit status such as IRS letter.
- Documents providing a description of you organizations purpose such as Article’s of Incorporation.
- Proof of your organizations operations such as brochures, bulletin, or meeting minutes.
- *Important Note: Places of worship have much fewer supporting documentation requirements than other nonprofit organizations.
- Complete form PS Form 3624, Application to Mail at Nonprofit USPS Marketing Mail Prices online through the Business Customer Gateway (BCG) or a physical form.
- Submit application and supporting documentation:
- Online in the Business Customer Gateway (BCG)
- To your local postmaster
- Or at your nearest USPS Business Mail Entry Unit (please note the search function on this page is broken. Enter your city and state in the search bar as such: Austin TX)
When successfully completed, your nonprofit organizations will receive a Nonprofit Authorization Letter including your unique Nonprofit Authorization Number (NPA).
It should take approximately two-weeks to receive your Nonprofit Authorization Number (NPA) after submitting your application.
Step 2: Acquire Mailer Identification (MID) and Customer Registration Identification (CRID)
In order to send bulk mail, your nonprofit will also need:
- Mailer Identification number (MID), if not already acquired.
- Customer Registration Identification number (CRID), if not already acquired.
MID’s and CRID’s are required for all organizations seeking to send bulk mail through the USPS. The good news is, if you apply for nonprofit status through the Business Customer Gateway, you’re automatically issued a MID and CRID and can ignore this step.
Step 3: Link Nonprofit Authorization (NPA) and Customer Registration Identification (CRID)
Once all these elements are acquired, you must link your NPA and CRID with each other in the USPS system. This can be done by a Bulk Mail Technician at a USPS Business Mail Entry Unit (BMEU).
Eligibility Criteria
While nonprofit status with the IRS is a requirement to receive nonprofit authorization from the USPS, you still must go through the application process with the USPS.
Just because you have nonprofit status with the IRS does not automatically mean you qualify for nonprofit status with the USPS.
Who Qualifies for Nonprofit Status With The USPS?
The following organizations are generally considered to be eligible for nonprofit status with the USPS:
- Agricultural
- Educational
- Fraternal
- Labor
- Philanthropic
- Religious
- Scientific
- Veterans
- Some political committees
Organizations That Do Not Qualify for Nonprofit Status With The USPS
Many organizations that might qualify as a nonprofit with IRS, exempting them from income and/or sales tax, do not qualify for nonprofit status or discounted postage rates with the USPS. This includes:
- Business Leagues
- Chambers of Commerce
- Social and Hobby Clubs
- Certain Political Organizations
- Government Entities
- Service Clubs
- Trade Associations
For the most detailed eligibility requirements refer to Publication 417, Nonprofit USPS Marketing Mail Eligibility or confer with your local Business Mail Entry Unit.
Not All Mail Qualifies For Nonprofit Rates
Even if your organization is eligible for nonprofit rates, not all mail that is sent by a nonprofit is eligible for nonprofit rates.
First, only marketing mail, also known as bulk mail or presorted mail (including Every Door Direct Mail), receive nonprofit rates on postage. There are no discounted rates for first-class mail for nonprofits.
Bulk mail sent by nonprofits receiving discounted postage rates have certain content restrictions such as the amount of advertising it can contain. This is to avoid commercial organizations from circumventing the system and receiving discounted rates by mailing through a nonprofit.
Nonprofit mail can, and should, contain advertising to offset costs of fundraising and communication campaigns but you need to make sure that it follows the guidelines. Refer to Publication 417 for more details about content requirements and confer with your local BMEU for approval of your mailer.
Required Documentation
As part of your nonprofit application process with the USPS, you must provide documentation that supports your eligibility.
This documentation falls under three categories:
- Evidence of Nonprofit Status
- Description of Organizations Purpose
- Proof of Organization’s Operation
It’s important to collect this documentation before applying for nonprofit status.
Evidence of Nonprofit Status
This is evidence that your organization is a nonprofit and none of its net income is to the benefit of any private stockholder or individual.
You need one of the following:
- Internal Revenue Service (IRS) Letter of Exemption
- Complete Financial Statement From an Independent Auditor
In most cases, an IRS Letter of Exemption is the best document.
*Places of worship, like churches, do not need to provide evidence of nonprofit status.
Description of Organization’s Purpose
These are documents describing the organization’s primary purpose,
You need one of the following:
- Articles of Association
- Articles of Incorporation
- Charter
- Constitution
- Enabling Legislation
- Trust Indenture
*This is optional for places of worship
Proof of Organization’s Operation
These are materials showing how the organization actually operated during the previous 6 to 12 months and how it will operate in the future.
You need two of the following:
- Brochures
- Bulletin
- Financial Statements
- Listing of Activities for the Past 6 to 12 Months
- Membership Applications
- Minutes of Meetings
- Newsletters
- Publications Produced by the Organization
*Places of worship are only required to provide their Bulletin
File Requirements
It’s important to have these files ready for upload before you start the application process.
You need to prepare each document as a PDF.
Each PDF document needs to be named in a specific way. The names must not contain any special characters or extra spaces and must be simply descriptive of what they are i.e. If the document is an IRS letter, name it “IRS”. If the document is Articles of Incorporation, name the file “Articles of Incorporation”.
Step-by-Step USPS Nonprofit Online Application Process
While you can apply for nonprofit status with the USPS through your local Business Mail Entry Unit or Post Master, the easiest way to apply is online through the Business Customer Gateway (BCG).
You will need a BCG account for other mailing activities anyways, so it’s smart to create an account and apply there.
In this step-by-step guide, I will walk you through how to:
- Create a Business Customer Gateway Account (if you don’t have one already)
- Apply For Nonprofit Authorization in the Business Customer Gateway
- Link Your Nonprofit Authorization Number (NPA) to your Customer Registration Identification Number (CRID)
This process should only take 15-30 minutes and once completed, you will be on your way to sending nonprofit mail in no time.
Create a Business Customer Gateway Account
The Business Customer Gateway (BCG) is a central location for all of the USPS business services online. It is essential that if you are going to be sending bulk mail through the USPS, you create a BCG account.
If you already have an account, you can skip this step.
When you create a Business Customer Gateway account, you will receive a Mailer Identification number (MID) and a Customer Registration Identification number (CRID). This is important because you will need these numbers to send bulk mail through the USPS along with your Nonprofit Authorization Number (NPA).
Step 1: Go to Business Customer Gateway Homepage
Go to the Business Customer Gateway homepage and click “Sign up for the BCG”

Step 2: Enter Your Email Address

Step 3: Check Mailbox and Validate Email

Step 4: Enter Your Organizations Information

Step 5: Agree to Terms & Conditions
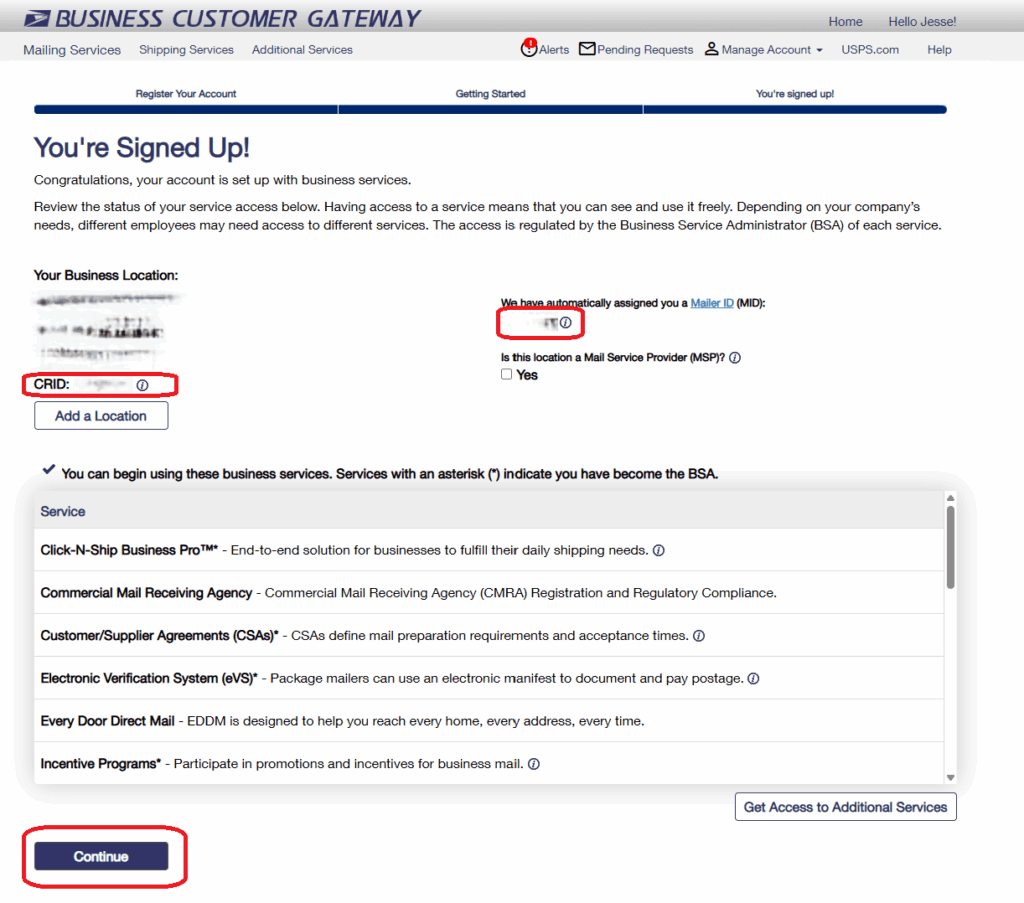
Step 6: Business Gateway Account Setup Complete
Notice that you have now been issued a CRID and a MID with your new account. Great!

Apply For Nonprofit Authorization in Business Customer Gateway
Now that we have established an account with the Business Customer Gateway and you have received your CRID and MID numbers, the final step is to apply for Nonprofit Authorization in the BCG itself.
Step 1: Click on “Mailing Services” in Upper Left Corner of BCG Homepage

Step 2: Find “Postal Wizard (PostalOne!) and Click “Go to Service”

Step 3: Under “Complete Customer Service Form”, Click On “3624 – Application to Mail at Nonprofit USPS Marketing Mail Rates”

Step 4: Enter the Zip Code of the nearest Bulk Mail Entry Unit to your organization
In my example below, I entered 78710 because that is the Zip Code where my local Bulk Mail Entry Unit (BMEU) exists in Austin.

In order to find the Zip Code of where your nearest BMEU is, use the Business Mail Entry Locator.

Be sure to enter the nearest city with state just as I have done above (Austin TX). This tool only operates well if you do this format precisely. Do not search with Zip Code.

Pick the closest Business Mail Entry Unit to you and copy the 5 digit Zip Code which, in my case is 78710.
Step 5: Begin Filling out PS Form 3624
It’s important to input the exact name as indicated on your IRS approval letter. Abbreviations, acronyms, or name variations will delay your application process.
Also, it’s required that you input a full Zip Code + 4 formatted Zip Code in the application. To find you Zip Code + 4, click here.

Step 6: Fill out Questionnaire
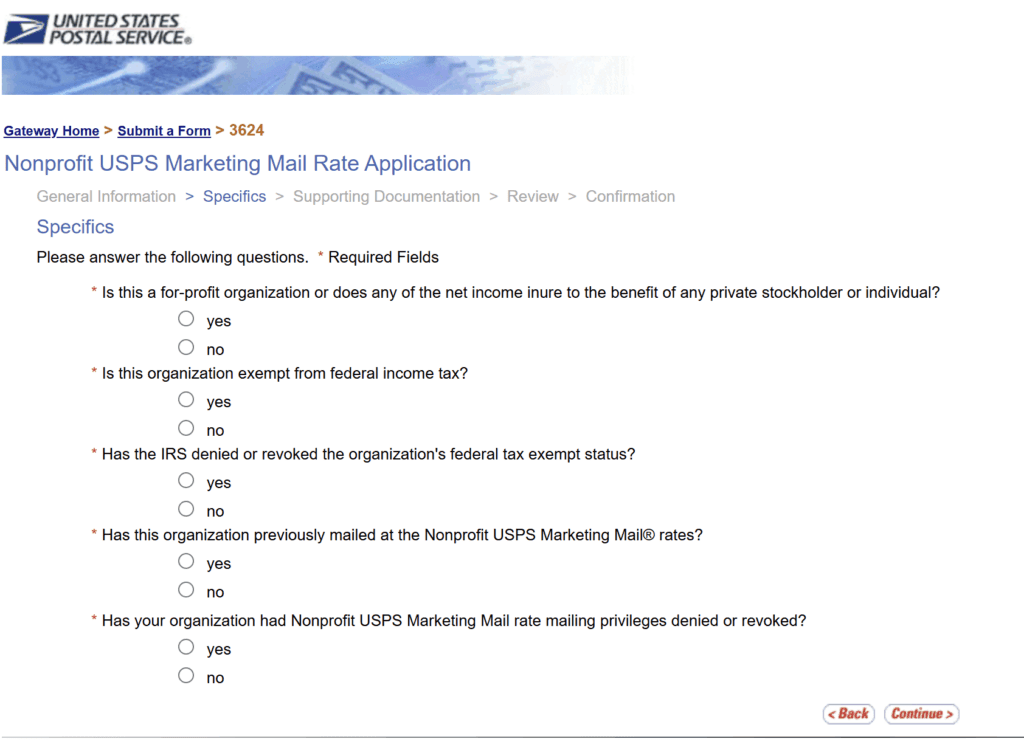
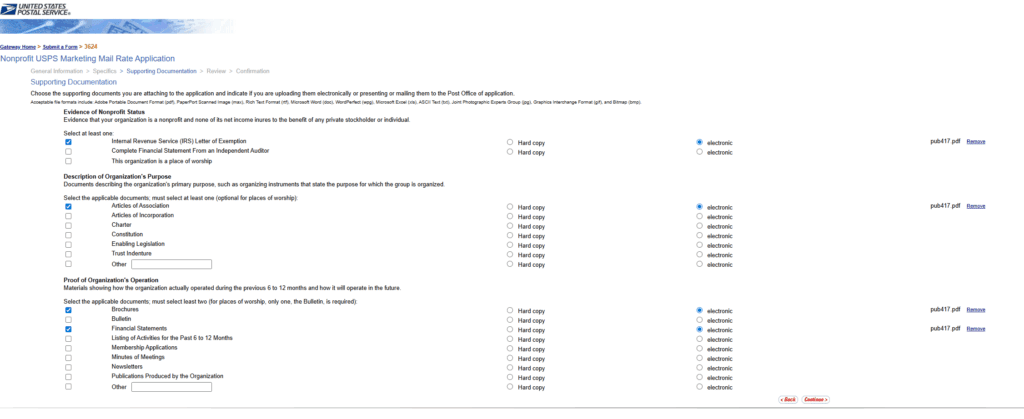
Step 7: Upload Supporting Documentation
This step can be a little tricky.
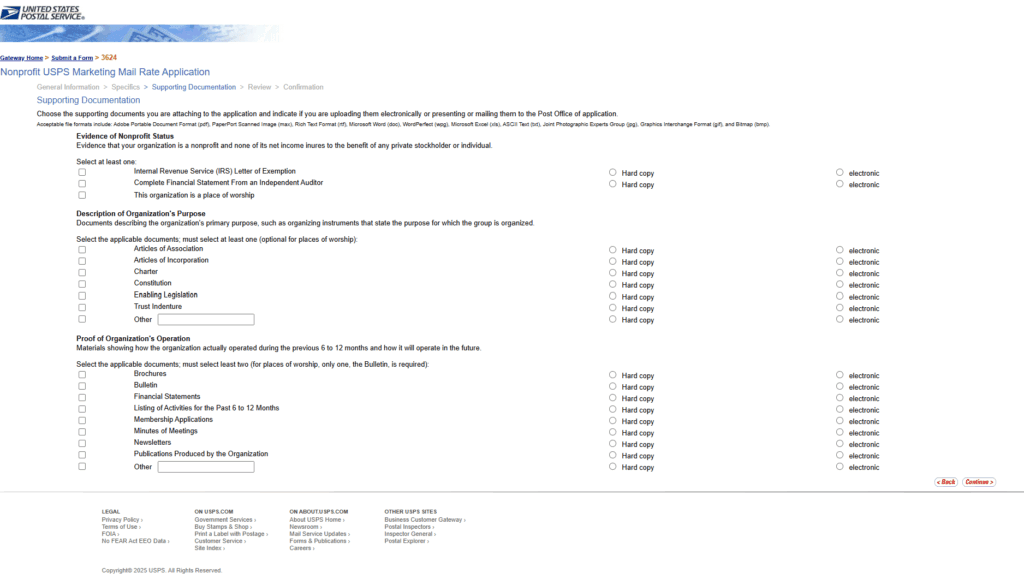
While the page states that you can upload a wide variety of file formats such as .jpg or a Word Document, other USPS official documentation explicitly states to upload a PDF document.
Each PDF document needs to be named in a specific way. The names must not contain any special characters or extra spaces and must be simply descriptive of what they are i.e. If the document is an IRS letter, name it “IRS”. If the document is Articles of Incorporation, name the file “Articles of Incorporation”.
On the left hand side, put a check mark next to each type of document you will provide. On the right hand side be sure to select the “electronic” button.
Select at least one document type for the “Evidence of Nonprofit Status”. This will most likely be your IRS Letter of Exemption.
Select at least one “Description of Organization’s Purpose” document.
Select at least two “Proof of Organization’s Operation” documents.
You’ll notice that there is no button to actually upload the documents. This is a flaw in the website itself. In order to upload the documents, you will need to click the “Continue” button in the bottom right hand corner after having selected which documents you want to upload and selecting “electronic” for each of the documents.
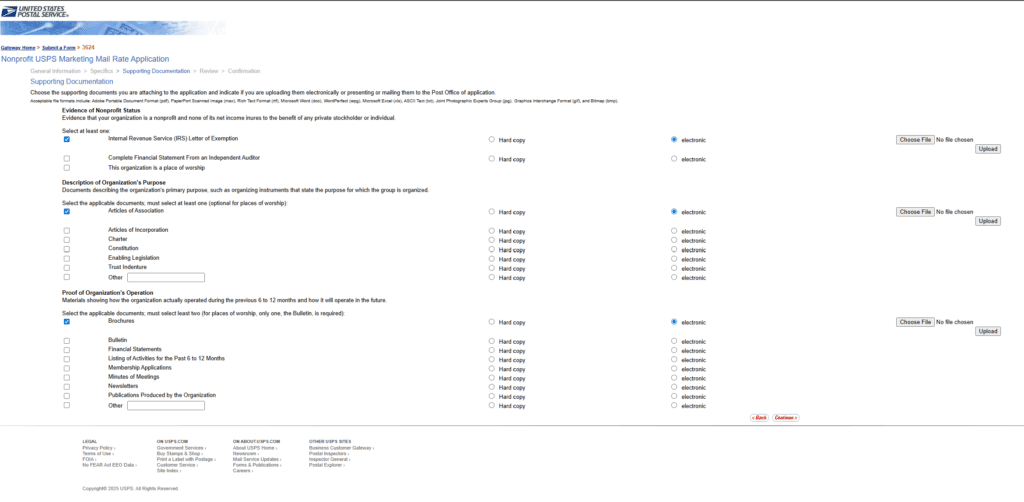
The “Choose File” and “Upload” buttons should subsequently appear on the right hand side of the page. On each of the documents, click “Choose File” and select the associated document from your computer. Then click upload. Once you’ve done this for all the documents, click the “Continue” button at the bottom of the page.
* Important note: Notice that Religious Organizations do not have to upload a “Evidence of Nonprofit Status”, “Description of Organization’s Purpose”, and only have to upload a “Bulletin” in the “Proof of Organization’s Operation”.
If you take too long to complete this process, you will have to start the application over. This happens all the time and do not worry. Just start at the beginning until you finally get through the supporting documentation process.
Step 8: Confirm and Submit Application
Once you’ve confirmed and submitted your application, you are done! It should now be only two-weeks or less until you receive your Nonprofit Authorization Number (NPA).
A USPS employee will review your application and if they have any questions in the review process, they will contact you via email or phone. Be sure to be on the lookout.
Link Your Nonprofit Authorization Number (NPA) to your Customer Registration Identification Number (CRID)
Once you’ve received your Nonprofit Authorization Number (NPA), you will need to be sure that the US Postal Service has your NPA associated with your Customer Registration Identification Number (CRID).
It’s possible that if you used the Business Customer Gateway application process, that the NPA has been associated with your CRID for you. If not, you will need to have a technician at the Business Mail Entry Unit (BMEU) to do it for you.
Use the Business Mail Entry Locator tool to find your BMEU like earlier. You can also call 1-877-672-0007 and see if they can do this for you over the phone. Worst case scenario, you will have to travel to your BMEU and request this in person.
If using a Mail Service Provider, they can likely help do this for you.
Start Mailing With Your New Rates
The easiest way to get started is to mail through a mail service provider. You can give them your NPA, CRID, and MID and they will be able to mail at nonprofit rates on your behalf.
Otherwise, you’re going to have to apply for a mailing permit with the USPS. These permits cost money and administration to maintain on an annual basis and if you’re not experienced with navigating the various compliance requirements for bulk mail, it’s not advised that you go this route.
As soon as you submit your application, you can start mailing at nonprofit rates. In the weeks before your approved however, you’re going to have to pay full marketing mail postage prices. Once approved, you can fill out PS Form 3533 and request a refund for the difference.
Maintaining Nonprofit Status
Now that you’ve unlocked nonprofit mailing rates with the USPS, you need to make sure you keep it.
As long as you mail a campaign using your nonprofit authorization every two years, you will be ok. Otherwise, you risk your authorization being revoked.
If your organizations contact or organization status change, be sure to update the USPS.
In Conclusion
It’s a bit of a process to receive your Nonprofit Authorization from the USPS but it is definitely worth it. Considering that direct mail is still the number one way to raise funds from individual donors and that with nonprofit postage rates on bulk mail you receive a 30-60% discount on postage, it’s a no brainer.
If you’d like help with this process, we’d be glad to help. Email [email protected] and someone will reach out to assist you.
FAQ: Applying For Nonprofit Status With The USPS
How long does it take to get approved as nonprofit with the USPS?
The approval process for nonprofit mailing status typically takes 2 to 3 weeks after USPS receives your completed application and documentation.
What is USPS nonprofit mailing status?
USPS nonprofit mailing status allows eligible organizations to send Marketing Mail at significantly reduced rates. This benefit is available to qualified nonprofits such as charities, religious groups, educational institutions, and certain political organizations.
What form do I need to apply for USPS nonprofit status?
You must submit PS Form 3624, Application to Mail at Nonprofit USPS Marketing Mail Prices. This form is required for initial approval and can be downloaded from the USPS website. Alternatively, you can fill out and submit this form through the USPS Business Customer Gateway.
Who qualifies for USPS nonprofit mailing privileges?
Nonprofit Organizations that generally qualify include:
Charitable organizations
Religious organizations
Educational institutions
Scientific or agricultural groups
Certain political committees
What documents do I need to include with my application?
You’ll need:
Completed PS Form 3624
A copy of your IRS determination letter or certified financial documents.
Your organization’s organizing documents (e.g., articles of incorporation, bylaws)
Evidence of activities supporting your nonprofit purpose
Does USPS nonprofit status expire?
No, nonprofit status does not automatically expire. However, USPS may periodically review your eligibility. If your organization changes its purpose or structure, you may need to reapply.
Can I apply online for USPS nonprofit mailing status?
Yes, you can apply for nonprofit status using the online Business Customer Gateway.
What happens if my application is denied?
If your application is denied, USPS will provide a written explanation. You can correct the issues and reapply. Common reasons for denial include missing documents, incorrect information, or failure to meet eligibility criteria.

